Showing posts with label Hero Academy. Show all posts

Saturday, April 21, 2012

Twin Paladins

The latest Tribes patch buffs Dwarves quite a bit.  Today I'm going to present my favorite way to play the Dwarves: Pumped up Twin Paladins!

The goal is to reach a point where I have a pair of fully upgraded Paladins.  They'll have Shield, Helm, Sword and be within range of each other to heal. 

Fully upgraded paladins are fearsome. 
  • They have 1200 health
  • Their aura buffs each other to 35% Armor and 35% magic resist
  • Their mutual aura also buffs each other to 315 damage
  • They heal for 600!
She's too sexy for this blog
To reach this point nowadays I play my Dwarves a little differently than what I've seen most people do.  A lot of people I've seen have super upgraded Annihilators, Grenadiers with Swords standing on red squares, etc.  To be sure, these approaches are super strong and win games and I will very often play my games this way if the opportunity presents itself.  In the absence of a clear opportunity, early game I focus on dumping a lot of units out onto the board.  If there are opportunities to gain an AP advantage then I'll take it.  Gaining an AP advantage mostly consists of trading units, or finding ways to do more than 400 damage per action point through AOE and red swords.


Throughout this process though I try to avoid using any of my swords, shields or helms on anything but paladins.  My first paladin is the most vulnerable, and I'll keep her in the back, load her with helm and shield early, and drink beer as necessary to keep her alive.  The goal is to cycle as many cards as possible while keeping a reasonable AP efficiency against your opponents actions until you can get to your second paladin.


Here's a game that ended on the final units, but my upgraded paladins carried the day.  Besides, what could be better than 2 Paladins?  How about 3 Paladins?  I hadn't saved any swords, but I guess when you have a scroll, who needs swords?
No swords, but I have a scroll

I'm sorry your necro is useless against 35% Magic Resist.  No wait.... I'm not.
Moar Paladins!
You can't cycle too fast, as you will definitely give up too much if you simply let your opponent use all 5 actions a turn stomping on your units or crystals, position so you're not a super attractive target, but make sure you're cycling through.

Much like the end game Wraith for the Dark Elves, end game Paladins are extremely difficult to stop without  bursty damage.

Here's a game from before the Tribal Patch

My crystal is lower but my twin paladins are in position
And now I'm going to win....

Now with the Tribal patch, 1200 health with both 35% armor and 35% magic resist is 1846 effective health (1846 damage must be done to kill her). Keeping in mind a stomp, this means an enemy needs to do 1850 damage in 4 actions.  Even an Archer with a sword (450 damage per attack) is only going to do 1800 in 4 actions

This strategy has proven to be ridiculously effective against Dark Elves.

  • The Dark Elves have trouble doing much burst as their Impaler (300 damage) only has range 2
  • Their "nuke" in the form of Soul Harvest is not really a damage dealer
  • They do not have much physical armor, which makes them more vulnerable to the Paladin's swings
  • The only unit which even comes close to posing a threat is a fully upgraded Wraith, which is easily disposed of with the assistance of your Pulverizers.

This strategy is also effective against Humans and Dwarves.  Dwarves can sometimes 'cause a problem depending on how you each use your scrolls and Pulverizers, but here's a game I played recently where my opponent did standard play with Annihilators, Sworded Grenadiers, etc. and I went as quickly as I could to triple upgraded Paladins


Double Paladins has been least successful for me vs. Tribe.  The Tribe Grunts are the most effective killers of the pumped up Paladins, combined with burst damage from Bloodrage and/or meat they can often stomp even fully upgraded Paladins.  In addition the Tribe Chain Heal is very effective in the early/mid game for counteracting any AOE moves the dwarves try to try and squeeze out a gradual AP advantage, so clogging the board with lots of units is not always working in your favor.

Sunday, March 4, 2012

Hero Academy First Turn Advantage

The advantage of going first in Hero Academy has been on my mind for the last week or so.  The topic has come up on the Robot Entertainment forums with a few solutions proposed.  I've been brainstorming up some solutions and would like to share some today.

For those who are not aware, there is a First Turn Advantage (FTA) for going first in Hero Academy.  Many games have this problem and different games have come up with different solutions to it.  In Hero Academy the person who goes first is always 5 actions ahead.  This 5 action advantage is more noticeable on some maps than other and is also more noticeable at higher levels of play.

The single large crystal map has a particularly strong FTA .  This makes sense, because the relevance of the FTA goes up for short games, and the single large crystal map usually has shorter games. Here is a worst-case scenario (but unfortunately not atypical) shot of a game I had this week.  My opening hand had two Knights which I used to secure the two purple assault tiles very quickly.  To make matters worse my opponent is playing Dwarves and has no ability to move my Knight (such as with Knight knockback or Impaler tug).

The map is bursty already - and the FTA exacerbates the issue.

With both assault tiles secured, I just start bursting down his crystal.  In this shot you can see I'm even using a priest now to attack the tile, who can deal a whopping 800 damage per attack thanks to control of both Assault Tiles.  On the subsequent turns I follow up with my Knight, Archer and Ninja -combined with the health potion and the scroll - I can charge straight at my opponent's crystal with reckless abandon.  My opponent clearly has a dominating army on the board, and would win in a comparable situation on any other map, but the combination of the FTA and this map are overwhelming.

So that's the problem - but what's the solution?  Some of the most challenging design problems are those with a large number of solutions, but every solution has a different drawback.  The job of the designer becomes choosing the solution that best addresses the problem while being in line with his or her overall vision for the game.


Starting Player has a Smaller Initial Hand
You could start the first player with only 2 units in their hand.  This heavily restricts the options they have for the first turn
Pros: Might actually make the new player experience easier and more streamlined.
Cons: May not actually solve the problem, 5 actions is 5 actions and some games I play I spend all of my first 5 actions getting 1-2 units into position anyway.

Starting Player Deploys from a Single Deploy Zone
You could restrict the first player to only deploying on their first turn from a single Deploy Zone.
Pros: Simple.
Cons: Might actually be confusing to new players.  May not actually solve the problem.


Second Player can Mulligan
A "mulligan" is where you reject your starting hand and draw a new one.  In Hero Academy terms, you could allow the second player have an opportunity to discard any number of cards from starting hand and then draw back up to full before beginning turn.  The first player would have the action advantage but the second player would be minimizing the effect of bad draws

Pros: Asymmetrical advantages can be pretty cool. Some players really hate RNG so may enjoy going second.
Cons: Asymmetrical advantages are harder to tune.  This solution is binary, if it fails to solve the FTA there is no granularity on the tuning knob, you'll basically have to go with one of the other solutions anyway.  Introducing a solution that basically remove RNG for one player isn't very sexy.  Having players choose between a concrete action advantage vs. not being screwed over by their deck is not an appealing choice. Increased burden for teaching new players.

Manipulate Starting Hands to Favor Second Player
One subtle technique that games that are player vs AI (or player vs. environment) often do is manipulate the random number generator to favor particular outcomes. For example, the first player might have a reduced (or zero) chance of getting swords in their starting hand, while the player who goes second might be guaranteed a sword in their starting hand.

Pros: Could probably manipulate the RNG to get 50%.  New players will never know.
Cons: Feels icky.  Betrays the trust of the players who are expecting true RNG. Part of the longevity and appeal of Hero Academy comes from varying starting hands being a random element that players have to accommodate.

Fixed Starting Hands
A variant of manipulating via RNG - each race could have a pre-determined starting hand, with the second player's starting hand being better.

Pro: Good deal of granularity for tuning to 50% win rates.  A really nice side benefit is the New player experience might actually be better.  Starting hands that are easy to understand could also be accompanied by tutorials that are designed to match the starting hand.
Con: The randomness of the draw is part of replay-ability formula - could lead to many games feeling similar to one another.  This may be mitigated in the future by having a large board pool rotation and lots of available races.

Extra Item for Second Player
This is a variant of manipulating the deck but does it a clear way so the hardcore players know it's happening. Since the deck contents are set, you could throw an extra sword, shield, or scroll into the second player's deck.

Pros: If you choose something like a scroll - that's probably equivalent to the FTA.  This modification does not affect the new player experience at all.
Cons: Is very hidden from the player, (unless Robot decided to show deck contents).  Feels like a less elegant solution (though I will admit I'm having trouble verbalizing why right now).

Add a Deploy Phase at Game Start
Much like Warhammer, you could begin with a deploy phase.  Rather than take their normal turn, the game starts with a deploy phase where players can place a few initial units directly onto the battlefield.

The design team could play around with the deployment rules.  For example, no super units - perhaps the player who goes second is allowed 1 extra deploy, or one extra unit to choose from.  You could declare that the starting player can only deploy units in the first 2 columns but the second player can deploy units in the first 3 columns.  There are so many deployment rule variations this could become a fun and interesting side to the game.

Pros: Some players may actually really enjoy having a deploy phase.  A deploy phase also helps to mitigate starting hand RNG. Tuning has a lot of granularity which makes it easier to get to 50% win rates.
Cons: Complicates the game with an entire new phase.  May add a barrier-of-entry for new players.  May make understanding the deployment squares in future turns confusing for new players.  Reduces some of the strategic options such as 1st turn Rambo Monks.  FTA with a deploy phase may have varying value based on the board, which increases the tuning complexity for future board designs.

Adjust Starting Crystal Health
In Go there is the notion of Komi - a point advantage granted to the player going second to compensate for the disadvantage.  When I started playing Go 15 years ago Komi was 5.5, but is currently 7.5 in the United Staes.

In Hero Academy the equivalent would be for the starting Crystal Health amounts to not be equal.  For example, instead of the standard 4500 health, the second player could have 4800 health per crystal.

Pros: Minimal impact for the new player experience.  Allows a very precise tuning knob that can be adjusted based on the map.  Elegantly preserves the symmetry of the rest of the game.  If a map ever needs more than about 400 crystal health adjustment (800 total) to bring the map to a 50% win rate, I would start to question the map design.  (For example, on the aforementioned single crystal map, I could see a crystal Komi adjustment as large as 2000 not being enough - which starts to hint that the map design itself needs to be revisited).
Cons: In some matchups you don't even attack the crystal until board control is established, and at that point it doesn't matter what the starting crystal health was.  It feels a bit strange that one player's crystal is not the same health as the other's.  This can probably be mitigated if desired by inserting some text or a mini animation in between the first and second turn "Bonus health for second player" - though that might just be even more confusing to new players.  In general - but particularly as a free to play game - I'm pretty sensitive to changes that makes the new player experience more confusing or intimidating.  Depending on the UI visualization, I could very easily see it as being awkward to compare "Who's crystal is at lower health?" unless one person's crystal health bar either started higher than 100%, or one person started lower than 100%.


First Player Starts with Less Actions
This is a fairly popular forum suggestion - since this is mostly about the first player always being 5 actions ahead, why not reduce the actions of the starting player?

Some people have suggested 4 actions but I think that's just silly - 4 actions is saying "We acknowledge there's a problem so we'll half fix it, but it'll still be a problem"

Reducing to 2 or 3 actions would be the correct fix if Robot chose to go down this road.
3 actions - This says "yeah there's an advantage but we've made it as small as possible" - and hey - maybe the second player's ability to deploy their army in response to the decisions made by the first player could be a small advantage of it's own.
2 actions - This actually gives the action momentum to the second player, but leaves the first player - arguably, with an "Initiative" advantage.

This is actually the solution I've personally adopted in my games. If I ever challenge you to a game, I voluntarily give up 2 actions now when I go first, accompanied by the following text:

I encourage anybody else reading this to consider adopting this convention as well.  Perhaps, much like "throwing the second round" in Street fighter or "Solo-Mid" in League of Legends, we can probably fix this via social convention for the people that care.  If you care about FTA, surrender 2 of your starting actions!  Or - if you want to be really boss - voluntarily surrender 3 of your actions and only start with 2 actions!


Pros: I think starting with only 2 or 3 actions will bring Hero Academy about as close to 50% as we reasonably need.
Cons: You may be detecting a pattern - but I think a forced 2 or 3 actions for the first turn will hurt the new player experience.  As a free-to-play game Robot needs to make sure when somebody downloads Hero Academy and challenges their friend - those first 30 seconds need to be representative of the game and feels satisfying.  The other possible con is that this solution probably won't bring the win rate to a theoretical exactly 50%,  but it would bring it a whole lot closer.

Conclusion
So there you have it - some solutions to the FTA.  I'd be curious to see if Robot does anything.  Personally I'd be just fine if they tweaked the single crystal map and left the rest to the community.  The community can use social convention to skip the first 2 actions among the hardcore players who care.  Organized league play can enforce skipping the first 2 or 3 actions very easily - it's akin to fighting game tournaments who will ban particular characters for that tournament under "generally accepted agreement" the character is overpowered or sports game tournaments who have at time banned the use of certain moves that exploit AI flaws beyond the control of the other player.

Sunday, February 26, 2012

Detailed Stats on Dwarves

[Note - this information as accurate as of posting.  A number of changes have been made since, not all of which are reflected in this post.
The following patch notes are all relevant


  • Diagonals hits are no longer penalized extra for AOE splash
  • Assault boost damage is now modified by AOE falloff
  • Increased Gunner splash damage from 50% to 66% - The gunner was lacking in ranged situations – he should be able to pack a rather large punch when upgraded with a scroll now.
  • Paladin gains a stacking 5% boost to power, defense, and resist to all allies in a 3x3 radius - Giving the Paladin an aura will help the dwarf units survive longer and deal a little more damage. The aura also works on crystals. We did this to incentivize players to move Paladins out into the field.
  • Engineer shield range up to 3 - The engineer will require less AP to maneuver and apply shields, which is a seemingly small but substantial boost.
  • Debuffs no longer apply if the target has an Engineer shield. This includes the debuffs from the Priestess and the Annihilator - The priestess will no longer be able to weaken units that have a shield on them, which is an inherent boost to the dwarves.
  • Pulverizer damage increased from 500 to 600 and now permanently removes physical armor - The Pulverizer now deals more damage and removes physical armor (non-helmets) upon hit.  This will help them to take out armored units more easily.
]

Racial Passive
  • All units get 20% additional benefit from power squares on the map.
  • You get 24% armor from a blue square
  • Red sword sSquares grants 120 damage 
  • Standing on a purple crystal increases damage done to crystals by 360.  
    • As with standard purple crystal square behavior, the bonus 360 is added as a bonus to the end of doing damage to a crystal, so dealing 5 damage to a crystal while controlling a purple square will deal 365 damage to it.
    • The 360 bonus damage is always added after all other damage calculations. So for example if the crystal has the -50% Armor debuff on it, the base damage of the attack is amplified first, and then the 360 bonus damage is added afterwards.  
    • For example, if the crystal has the armor debuff you drop a Pulverizer on it for 500 damage, you'll increase to 750 first (-50% armor) and then add 360 from owning a crystal for a total of 1110 damage.
Paladin
  • Classification: Fighter
  • Health: 1000
  • Armor: 10%
  • Magic Resist: 10%
  • Movement Speed: 2
  • Primary Attack: Melee Attack
    • Used at range 1.
    • 200 Physical damage.
  • Extra Ability: Heal
    • She always heals herself for half the amount she healed the target for
    • Heals a target for up to 400 per heal
    • Heal ignores line of sight, like all heals in the game.  So you can heal to the other side of enemy units.
    • If you are standing on a red square, you heal for 640 per cast.
    • With a Runemetal (sword) upgrade you heal 600 per cast
    • With a Runemetal upgrade while standing on a red square you heal for 960.
    • An easy way to remember this is the Paladin heals for 2x her attack.  She normally hits for 200, with Runemetal (+50% damage) it's 300, on a red square she gets +120 (dwarven bonus) so her attack is 320, and on a red square with Runemetal she hits for 480.
Grenadier
  • Classification: Caster
  • Health: 800
  • Armor: 0%
  • Magic Resist: 0%
  • Movement Speed: 2
  • Primary Attack: Grenade Toss
    • Used when the target is at range 2 or 3.  
    • Ignores line of sight (can lob grenades over enemies to targets behind)
    • Deals 200 magic damage with splash.  
    • The AOE splash is for 50% damage to the 4 adjacent squares and 25% to the diagonal neighbors.  
    • If you increase the damage of your Grenadier via a Sword or Red Square then the Splash damage is half of the final single-target amount. 
      • For example standing on a red square increases your damage to 320, then the splash will do 160 and the corners will take 80.
  • Secondary Attack: Hook attack
    • Used when the target is at range 1.  
    • Deals 100 magical damage.
Gunner
  • Classification: Shooter
  • Health: 800
  • Armor: 0%
  • Magic Resist: 0%
  • Movement Speed: 2
  • Primary Attack: Shotgun
    • Point Blank Range
    • 300 Physical damage
  • Secondary Attack: Shotgun Spread
    • 150 Physical damage to 3 squares.  
    • Damage topology depends on which direction you are shooting 
      • North, South, East West
      • If you are shooting North, South, East or West, you can imagine that you fire a second and third bullets in the same direction down either side.  The side bullets will hit the first target they come across.  So in the above screenshot, pink targets are hit before the blue ones.
      • NE, SE, NW, SW
      • If you are shooting diagonally, then you can imagine you're firing 3 bullets in a spread, each will hit the first target it come across.  Again, pink areas are hit before the blue areas.
Engineer
  • Classification: Support
  • Health: 800
  • Armor: 0%
  • Magic Resist: 0%
  • Movement Speed: 2
  • Primary Attack: Melee
    • Used at range 1
    • 200 Physical damage
  • Extra Ability: Shield
    • Shields a unit up to 2 squares away.  
    • Can only have 1 shield active at a time. 
    • Casting a new shield removes the previous shield.  
    • Shield negates all damage from exactly 1 attack.  
    • Shield persists over multiple turns until consumed.  
    • The amount of damage done by the attack is irrelevant whether it's 5 damage from incidental splash damage or 600 damage from a scrolled Wizard.  
    • If the enemy hits a shield unit with an AOE attack, the shield will prevent the damage to the primary target but the other targets will still take the full AOE damage as though the target were not shielded.  
    • The shield protects from damage only, debuffs from the attack (such as the Annihilator's -50% physical resist debuff) will still be applied.  
    • If the Engineer is killed the shield that the Engineer had active is removed.  
    • Units can only be protected by one shield at a time
    • If a unit is already protected by a shield you cannot cast a new one on it, and you cannot "transfer ownership" of the shield from one Engineer or another (at least, none that I have found).  
    • If an attack that is shielded has a movement effect, such as the Knight's knockback or the Impaler's pull, the movement effect is also negated. 
    • Ignores line of sight (you can cast shield through enemy units)
  • Passive: Extra Power Square Bonus
    • The Engineer also receives a 40% bonus from power squares, rather than the standard Dwarven bonus of 20%.
      • This means she gets 140 damage from Red Sword squares
      • 28% Armor from Blue Squares
      • Purple squares cause 420 extra damage to be done to the enemy crystal.
  • Second Passive: Extra Cute
    • The Engineer is the cutest unit in the game
    Annihilator
    • Health: 650
    • Armor: 0%
    • Magic Resist: 0%
    • Movement Speed: 2
    • Primary Attack: Rocket Launcher
      • Up to range 3.
      • Deals 300 magic damage to the primary target and has AOE.  
      • The primary target has it's armor reduced by 50%.  
        • This is a flat 50% and allows units to go into negative armor.  
        • For example, a Void Monk (20% Armor) on a Blue Armor square (20%) who gets hit will lose 50% armor and be at -10%.  
        • The Physical armor debuff can be applied to crystals as well.  
        • The physical damage debuff applies to the next Physical attack the target takes. 
        • Negative armor means you actually take more damage.  A unit with -20% Physical Armor will take 20% more damage from the next attack.
        • The debuff will persist over multiple turns and lasts until consumed
      • All enemies neighboring the target unit are knocked back one space. 
        • If the adjacent space is occupied the knockback doesn't happen. 
        • The knockback will happen diagonally too, and the adjacent units are knocked diagonally.
      • Adjacent targets take 20% of the damage of the primary target. 
      • Diagonal targets take what appears to be 4% of the primary target, but the damage is rounded to the nearest multiple of 5


      Dwarven Brew
      • Consumable
      • Heals for 1000
      • Cannot resurrect a fallen unit
      • Grants a +50% Armor and +50% Magic Resist buff against the next attack.
      • This buff stacks linearly with any other bonuses so if you already have 20% Magic resist from a helm, you go up to70% Magic Resist
      • The buff persists until consumed
      Pulverizer
      • Deals 500 Physical damage to a single unit anywhere on the map
      • If you hit a crystal, it deals AOE damage to the units adjacent
        • Units adjacent to the crystal take 40% of the damage done the crystal.
        • Diagonal Units take 16% of the damage done to the crystal.
      • If you control a purple power square, damage to the crystal is enhanced by the Pulverizer and the splash damage is enhanced as well.
        • For example, if you have a crystal (+360) then you'll deal 860 damage per Pulverizer and deal 340 damage to adjacent units (damage numbers in Hero Academy are always rounded to the nearest 5)


      Dwarven Deck Contents
      1x Annihilator
      3x Paladin
      3x Gunner
      3x Engineer
      3x Grenadier
      3x Helm
      3x Shield
      3x Sword
      2x Scroll
      2x Dwarven Brew
      2x The Pulverizer

      Finally some closing thoughts, some interesting aspects of the Dwarves compared to the other two existing races
      • The Dwarves have no ranged stomp, unlike the Council fireball or the Dark Elf Necromancer
      • The Dwarves have no way to surprise resurrect in the field, unlike the Council potion and the Dark Elf Soul Harvest
      • While every race has a unit that does 300 Physical damage, the Dwarves deal it only at point-blank range.  So outside of their super unit, the Dwarves have trouble dealing heavy single target damage
      • Between the no ranged stomp and the lack of high single target damage, the Dwarves essentially have the hardest trouble sniping specific enemy units.
      Thanks to Jeff Gates, Travis Day and Jake Sones for helping me write this update.

      Sunday, February 19, 2012

      Tips for playing against Council with Dark Elves

      I've heard a lot of people complain that the Dark Elves are weaker than the Council.  While I tend to agree, I do not think the gap is very big.  The two races seem very well balanced against each other and I think the power gap in the races is smaller than the power gap between a good draw and a bad draw.

      So with that in mind, I thought I'd try to publish some tips for playing as Dark Elves vs. Council.  If you haven't already, I recommend the tips posted over at the James Review.

      From a big picture standpoint, the Council are more tightly bound to their roles than the Dark Elves are.

      • The Council tank is very tanky, but the Dark Elf Void Monk can do some DPS when needed.
      • The Council healer heals for more but the Dark Elf army can heal without a Priestess 
      • The Council archer does massive amounts of ranged physical damage but cannot deal damage at point blank range
      This specialization of roles is where the Council draws it's power.  If you confront a Council opponent and let them set up a formation with a frontline of Knights with Wizards and Archers behind and a Priest support, you are going to get wrecked.  The Dark Elves are not as well equipped to fight on a battlefield with 8+ unit compositions on each side.

      Although it looks fairly even, I can't help but feel I'm going to get wrecked

      Your goal as Dark Elves is to force lots of favorable unit exchanges repeatedly.  If the board gets clogged up with units, your chances of winning go down (as James illustrates nicely with his Battering Ram and Phalanx illustrations).  Not only does a clogged up board make it easier for the Council to create formations that highlight unit strengths and cover weaknesses, but the Council has better AOE damage in the form of their Fireball and Wizard.

      When playing against the Council I like to imagine a fighter in an MMA match: my opponent has longer reach, faster punches and stronger kicks - but I have a better ground game.  My goal is to bring the fight to the mat and keep it there.  My opponent is standing on two legs, and my goal as the Dark Elves is to knock out one of my opponent's legs.  I'm fairly confident if I can knock out one of those two legs without sacrificing too much in the process, I'll be in good shape. The Council's two legs are:
      1. Left Leg: Healing.  The Council is heavily dependent on the 3 priests for healing.
      2. Right Leg: Physical damage.  The council army has 3 sources of physical damage, of which only the 3 Archers and the Ninja matter. (Let's face it, the 3 Knights are pretty bad at dealing damage)
      This leads to two obvious approaches

      Approach #1: Kill the enemy priests.
      If you are going down this road you want to suicide your units to take out enemy priests.  Remember that priests can't heal themselves, so if your opponent has only a single priest on the table, it's okay to take a priest low, or fail to stomp her.  Granted, your opponent might have a potion in hand or a priest in reserve, but I can't tell you how many times I've charged a priest with my void monk for 600 damage, and managed to kill the priest on a following turn.  The risk is worth the reward: kill priests with extreme prejudice.
      Tips for approach 1
      • If there are no priests on the board, play a slightly conservative game but keep pressure on.  If both players are running back and forth plinking at their opponents the Dark Elves will win due to their life leech.  Doing light and consistent damage to your opponent will probably draw out any priests that are sitting in hand. 
      • Watch for your opponent swapping tiles or excessive upgrade usage.  Good Council players are more comfortable when there are two priests on the board.  Tile swapping or sub-optimal plays may be priest-fishing if your opponent hasn't placed two yet.
      • Be far more aggressive when there is only a single priest on the board.  Much like rabbits, priests need population control.  Beat on them when there's only one.  Once there's two priests the job is much harder.
      • Save your scrolls for two priest, or stomp situations.  Your deck has two scrolls, they have 3 priests.  In a perfect world each scroll translates into a priest kill + stomp.  This leaves a 3rd priest who can be slowly killed at a convenient rate since priests can't heal themselves.  If you manage to kill a priest without a scroll, then you can use your scroll elsewhere.
      Approach #2: Kill the enemy Ninja and Archers.
      Approach #2 is harder to pull off than Approach #1 but in my experience has a higher rate of success once you've attained it.  Your end-game plan is to use either a fully upgraded Wraith of a fully upgraded Void Monk to make life miserable for your opponent.  If you have a fully upgraded Wraith and you've killed the enemy Archers and Ninja's you've pretty much guaranteed a win.  A fully upgraded Void Monk will need a little bit of careful management but will still be extremely difficult for your opponent to deal with.

      Note that fully upgraded means
      • Sword
      • Leech Gem
      • Helm
      • +50 Health from Potion
      • +Health from Soul Harvest if available
      Here's a game I recently had.  My opponent lost all 3 archers and his Ninja.  I had lost everything on the board to get to this state except for my lone Wraith and 7 cards left in my deck.
      Wraith: "Don't worry guys, I got this"
      My opponent used 2 turns to set up further while I put a priestess on the board for safety.
      Priestess is positioned in range to heal the Wraith while standing on Armor buff square

      My opponent's fully geared Knight is a concern, and I need to make sure I don't get cornered.

      I use my scroll to take out the full geared Knight,

      Ultimately, a few turns later, my opponent concedes, realizing that with only Knights, Priests and Wizards, there's no way for him to kill the Wraith.

      Without a Ninja, archers, and assuming you don't stand in a corner next to a Knight, here are some facts to consider about our lovely Wraith

      • If your Wraith swings just twice a turn he'll deal up to 1200 damage.  Usually you'll do less because of overkill - absolutely conservatively you'll deal 800 to kill a unit. This means you'll leech ~534 damage minimum without even trying.  If you manage to deal 1200 or even 1800 damage you'll be leeching 800-1200 health.  
      • A Wizard using all 5 attacks on the Wraith will only deal 700 damage.
      • A Wizard with a sword or standing on a red quare, using all 5 attacks will deal 1050 damage - still not enough to kill a Wraith.
      • A Wizard who Equips a weapon and then uses a scroll, followed by 3 attacks in a row is still only going to cause 1050 damage
      • A Wizard with a weapon and using a scroll plus 4 attacks deals 1260 damage - still not enough to kill the Wraith!
      • A Wizard using a weapon and standing on a red square will deal 1575 damage. This is finally enough  to kill a Wraith but doensn't have an action left to stomp!  so with a Priestiess or Soul Harvest handy you can easily recover.
      • A Wizard using a weapon, standing on a red square, and using a scroll can deal the 1575 damage and stomp.
      • What this means is that, assuming you Wraith is at full health, the only thing you have to worry about is a Wizard, with a weapon, standing on a red square.  And even then if your opponent has used both scrolls and you have a Soul Harvest in hand you're still safe.  A Wizard standing on a red square is ridiculously easy to deal with too, just don't end your turn within range of him.
      • Generally speaking as long as you don't end your turn within range of a red square or backed into a corner where a Knight can attack your Wraith is going to solo their entire team.

      If you don't have a Wraith available, a Void Monk can sometimes do the job too.  The Monk may not have as much health, but he has 40% Magic Resist and 20% Physical Resist when upgraded.  This means the Monk can take on any non-upgraded unit

      • Damage the Monk will take: 160 per attack from Physical, 120 per attack from Magical
      • Health the Monk will leech with gem: 200 per attack against unarmored foes, 160 per attack against 20% resistant armored foes.
      As you can see, while the Void Monk can't lock up a game quite the way a Wraith can, he can very often lock up the game enough to secure a win.

      So how badly should you try to kill Council Priests and Archers?  While there are no firm rules - it always depends on the current game state - here are some general guidelines
      • I will happily trade any non-Wrath unit without upgrades for an enemy Archer or Priest any day of the week and twice on Sundays. When an opponent  presents an Archer or Priest to me for trade it feels like Christmas.
      • I will trade any non-Wraith unit with a weapon upgrade to get my second priest kill (because you know after you've killed the second priest, the third one will fall easily due to the inability to heal herself).
      • I will trade any non-Wraith unit with 2 upgrades to kill an archer with a weapon upgrade.  
      • I typically save scrolls to kill either a priest, an archer with a weapon upgrade, or a Ninja
      Finally to close, here are some tips for actually killing those enemy priests and archers in games against more experienced opponents who are doing a good job protecting their squishies.
      • Watch for lone priests and archers in the early game.  There are lots of games where after the first 1-2 rounds of setup, I'll run straight across the board with a Void Monk or an Impaler at the enemy priest.
      • If the board is starting to stall out but you see a priest that you think could be weak, push forward with 3 units at once.  Your opponent will kill one of your units leaving 2 units in striking range.  At that point you're trying to get a 3 for 2 trade.  It's not as ideal but against good opponent's it's often the best you can do.
      • Sometimes the board is so clogged you have to pre-scroll.  Pre-scrolling a weapon'ed necromancer is usually enough to take out a priest or archer that's only moderately protected. Don't be afraid to sacrifice a void monk to get your damage closer.  If you're getting desperate, try moving your impaler or necromancer a little closer than usual, but place a void monk in front for protection such that the Void Monk might die, but your damage unit will nab the target.
      Hope those tips help!  All the best!


      Sunday, February 12, 2012

      Design Stab at Hero Academy Dwarves

      Robot Entertainment is scheduled to release a third race in the future: the "Dwarves".  You can see a very short preview at the end of their Master Class video.

      I thought it would be fun to take a stab at designing out the units.

      Caveat: This is not the official design!  This is a completely independent take on the units based on the concept art.  It's just random ramblings I thought would be cool.

      Here's the concept art screenshot they provide at the end of the video.


      As I documented in my previous post, each of the existing races follows a specific pattern.  For the purposes of this exercise I'm going to assume that Robot wants to stick to this general pattern.  I'm going to reiterate, I have no idea what the actual design is, I'm just making this up for fun because I love the game and I like designing stuff.

      So the first observation is that there are 7 units depicted, but each race only has 5 units.  This has 3 possibilities
      • The dwarves have more than 5 units
      • This is just concept art for unit ideas, but not all of them made the cut
      • Some of the units depicted are "upgraded" versions
      I'm going to assume the third.  Obviously the two on the right are the same unit.  I'm going to pretend that the top two middle units (the two ranged shooters) are actually the same unit and I'm also going to assume that the two on the bottom middle are the same unit too.

      Based on the art, I'm thinking there is the standard +20% Magic Resist magic helm.  As a racial specific upgrade, I'm giving the Dwarves a +1 range upgrade.

      Here is my design stab:

      # Name PicHealthArmorMRMoveRangeDamageSpecial
      1 Mountain Giant

      1200 20% 20% 1 1 400 Phys Enemies hit by the Mountain Giant are stunned, and cannot perform any action next turn
      3 Berserker   1000 20% 0% 2 1 300 Phys
      3 Rifleman 800 20% 0% 2 3 200 Phys Deals 100 splash damage to enemies adjacent to the target square.
      3 Sapper 800 20% 0% 3 2 200 Magic If killed, explodes for 200 damage to adjacent enemies
      3 Valkyrie 800 20% 0% 2 2 200 Magic Can heal for 450, 2 square range
      2 Grog Heals 1000 Life or revives a unit.  Also permanently increases the unit's damage by 50
      2 Scroll 3x damage on next attack
      2 Oktoberfest

      Deal 350 Damage to enemies and heal allies for 350 Life in a 3x3 area.
      3 Sword Adds +50% Attack
      3 Helm Adds 10% health and 20% Magic Resist
      3 Range Upgrade
      Equipped unit has +1 Range

      A few notes.

      First, I gave the dwarves 20% inherent physical resist on every unit.  The Dark Elves have life leech, and the humans have priests that heal for extra large amounts.  At the same time  think 20% inherent physical resist on all units is probably strong, so I tried to compensate by making the healer range 2, and only heal for 450 (50 more than a Dark Elf Priestess I think?).

      The other big thing is the range upgrade!  I figured the Warrior with the range upgrade would get a throwing axe.  The Rifleman could also get a range upgrade. Normally already range 3, with the range upgrade he would be range 4.

      Some other ideas I had.  Thought maybe the dwarves could have passive life regen as a passive rather than phys armor, but regen might best be saved for a future race like trolls or undead.  I had an idea that the Mountain giant was beefier and could move 2 but could only be given one move command a turn.  I originally had it that the 3x3 bomb dealt damage and reduced the armor and magic resist of enemies int the area to 0 for the remainder of the current turn, but I thought that might be too mathy.

      Can't wait to see what the real Dwarves look like for real!

      Edit #1: Jeff G. mentioned that there should be some AOE damage and the Rifleman paralled the Archer too much and I agreed.  Changed Rifleman from 300=>200 damage but gave the Rifleman splash damage.  But that left the Dwarves without a 300 damage unit, which I gave to the Warrior, and renamed him a "Berserker".  That actually struck me as really good, as a differentiating point for the Dwarven race.

      Saturday, February 4, 2012

      Hero Academy Deck Contents

      Ever wonder what the Hero Academy army compositions were? Jake and I sat down and determined the contents of the Hero Academy decks.

      Each Army consists of:

      Council
      1x Ninja
      3x Knight
      3x Archer
      3x Wizard
      3x Cleric

      3x Helm
      3x Shield
      3x Sword

      2x Potion
      2x Scroll
      2x Inferno

      Dark Elves
      1x Wraith
      3x Void Monk
      3x Impaler
      3x Necromancer
      3x Priestess

      3x Helm
      3x Soulstone
      3x Sword

      2x Mana Vial
      2x Scroll
      2x Soul Harvest

      Dwarves (edit 2/24/2012 for Dwarves)

      1x Annihilator
      3x Paladin
      3x Gunner
      3x Grenadier
      3x Engineer

      3x Helm
      3x Shield
      3x Sword

      2x Dwarven Brew
      2x Scroll
      2x The Pulverizer


      Tribe (edit 4/8/2012 for Tribe)
      2x Chieftain
      3x Warrior
      3x Axe Thrower
      3x Witch
      3x Shaman

      4x Spike Armor
      3x Runemetal

      4x Haunch of Meat
      3x Typhoon


      This information can be useful when you're deciding how aggressive to be.  The problem is that the game doesn't provide any built-in log.  What's a person to do?  Keeping a separate log of the game state of every game seems like too much work, but at the same time, knowing that your enemy has used up both Scrolls and both Inferno's can be extremely valuable tactical information.

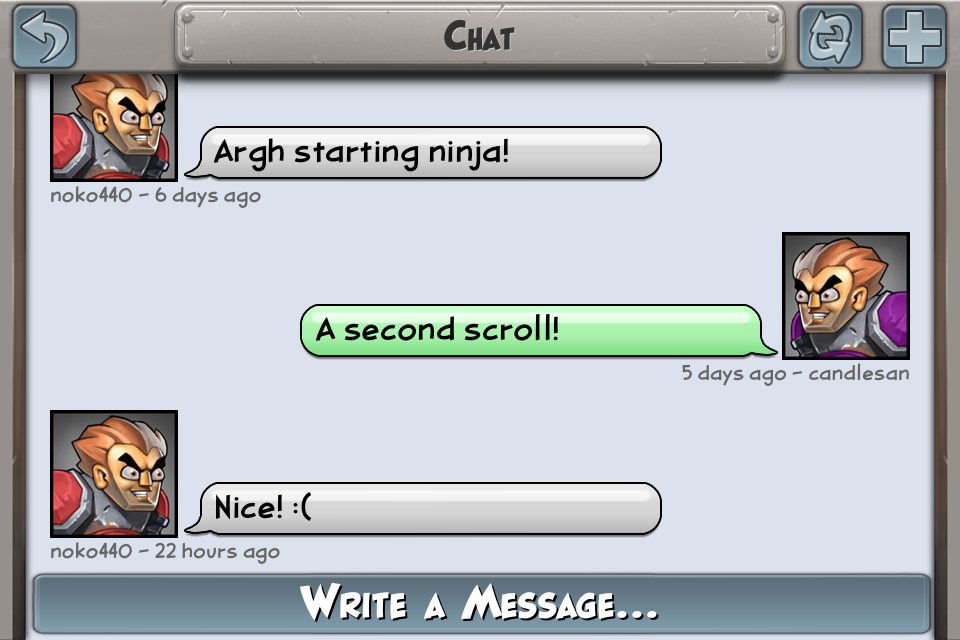
      Ideally, Robot would add some sort of combat log or a Deck Contents viewer to the side, but in the meantime I've been using the chat log as a makeshift recorder of important events.  In particular I want to track my opponent's scrolls and fireballs.  The chat log is integrated, attached to each game, and always available.  To be sneaky though, I've been disguising my log as friendly messages to my opponent.  Ha ha!  Check out these screens:


      As you can see, my combat log of my opponent's specials are cleverly disguised as congratulatory messages!
      On a serious note though, if you're in a game with me and you've read this, we can just start recording important events and not make a big fuss.

      Monday, January 30, 2012

      The Ninja Bomb

      Today I am writing about the Council strategy I call the "Ninja Bomb".  It's one of the most powerful Council configurations you can use.  It involves a dual-wielding Ninja, sitting next to your priest safely within your territory, and a heavily armed Knight with a Shield and Helm deep in enemy territory.

      The Knight has 1440 health, 40% armor and 20% magic resist.  This makes it virtually unkillable in a single turn to just about everything in the game.  Think about it, 1440 health can withstand:

      • 5 hits from any 200 damage unit (600 or 800 damage)
      • 5 hits from any 200 damage unit even when it's standing on a Red Sword (900 or 1200 damage)
      • 5 hits from any 300 damage unit (900 or 1200 damage)
      • ANY unit spawned in from the spawn locations.  An Archer/Impaler spawned in, given a weapon, and then a scroll.  (Spawn, weapon, scroll, attack, attack is 1800 damage, exactly 1080 after resists).  The only exception to this is a Ninja.  If your enemy still has their Ninja, just don't end your turn next to a spawn point.

      Once you have your Knight in enemy territory, and your Ninja safely on your side, you can set up turns that look something like:
      1. Swap Ninja and Knight
      2. Ninja Attack
      3. Ninja Attack
      4. Stomp
      5. Swap Knight back in for Ninja

      If your Knight is injured, you can substitute a priest heal for Actions 2-4.  If there's no risk of healer intervention you can skip the stomp.

      In pretty much every game I play as the Council I try to set up a good Ninja Bomb situation.  More and more of my Council opponents are doing it as well.  And, as this screenshot shows, a lot of my Council-Council games have double Ninja Bomb setups.  In this screenshot you can see my opponent has planted a Knight deep in my base, and I have my Knight (I haven't drawn a helm yet) in his endzone.


      A few Ninja Bomb tips

      • If you can end your Knight on red swords, the Ninja can do some crazy damage when he pops in.  A Ninja standing on a Red sword can 1-shot 800 health units.
      • Ending your turn on the enemy shield is incredibly effective as well, it renders your Knight completely immune to everything short of Archers standing on red squares.
      • Use your Knight's knockback to set up favorable positioning for a future turn
      • Enemy archers are typically the biggest threat, get up in their face to make it difficult for them to shoot for maximum damage.
      • Sometimes the best approach isn't to swap, but rather run straight in with your Ninja, and then on a subsequent turn you can port in a Wizard or an Archer to apply damage from the front while you continue to set up devastating bomb configurations.
      • Swapping for a second Knight back at home can allow you to keep up pressure at opportune moments without having to stop and heal.

      Playing against Ninja Bomb

      • Sometimes you can suicide a unit with a weapon and a scroll to dash directly at the ninja and stomp it.  If you ever get this opportunity, take it.  Losing a few units to take out a sworded Ninja is almost always worth it.
      • Try not to have any of your units end their turn next to the Knight.  You opponent wants nothing more than to port in and already be in melee range of a target.
      • Even though you can't take the Knight out in a single turn, try to plink a little bit of damage onto the Knight.  Do NOT shoot the knight more than twice if you can't kill it.  Your opponent will simply laugh and heal the damage away with a priest.  But if you spend 1 or 2 actions to plink the Knight your opponent will be forced to use an action to priest-heal it.  This will make it fairly difficult to have enough actions to stomp and still get the Ninja out to safety.  If your opponent doesn't keep the Knight topped off, the Knight will eventually be in health range to be bursted down.

      Sunday, January 29, 2012

      Winning with a Wraith that never attacked

      I recently lost a Hero Academy a game to an Empowered Wraith that never took a swing.

      How?

      Here was the early board position about 4 turns in:


      I'm playing purple on the left, and my enemy is orange on the right.  As you can see, the enemy Wraith at position A was pre-scrolled.  Pre-scrolling means my opponent had used a scroll on his Wraith but had not yet attacked with the Wraith. To be clear, generally speaking you almost never want to pre-scroll.  Pre-scrolling

      • Gives up the element of surprise
      • Leaves your unit vulnerable to being pre-emptively attacked and killed without you ever gaining the benefit of the scroll.  
      • vs. Dark Elves even if you can't be killed, it presents your opponent with an opportunity to hit with a Priestess debuff your pre-scrolled unit.  The Priestess debuffs any unit she attacks to deal 50% less damage on it's next attack, which means the 50% damage debuff will mess up your pre-scrolled attack.
      In this case, however, pre-scrolling the Wraith made a lot of sense because it set up the potential to
      Action 1. Move out
      Action 2. Kill an enemy in swing
      Action 3. Devour
      Action 4. Move back to safety

      This even leaves 1 extra action to spare which can be used for an extra move at the front or back of the action set, or an extra attack as needed.

      To compensate, I positioned all of my units to be outside striking range of the empowered Wraith.  The Orange area is how far the Wraith can get in 1 move, the Purple area is after 2 moves and the Red area are all the spots the Wraith could melee attack on Action 3.


      Here I was thinking I was so smart for staying free of the Wraith's zone of control, denying him the sweet use of his scroll and Wraith.  The problem?  The Wraith threat created such a huge sphere of influence, it enabled the rest of his army free reign over the board.  My opponent used my passivity to attack my crystals directly with Sworded Sorcerer from position A and B.


      I'm a bit embarrassed to admit, but the game ended about 5 turns later from continuous crystal damage. I spent so long trying to maneuver around the empowered Wraith, I wasn't putting enough pressure on his other units.  When I finally realized the imminent threat of continuous crystal damage, it was too late to do anything about it.

      In essence, the threat of the Empowered Wraith over multiple turns was far greater than the damage I would have incurred if I had simply allowed the Wraith to attack and devour one of my units.

      I would have been far better off rushing forward with multiple units at once, allowing the Wraith to devour, accepting the loss but putting forth serious pressure in return.

      Saturday, January 21, 2012

      Hero Academy: Using a Knight's knockback against itself

      When playing against enemy knights, be aware that their knockback is often an impediment to them dishing out damage.

      Here is a situation I found myself in recently.


      I am playing the White Dark Elves, we're near the end of the game.  Based on my current game state my Wraith needs 2 swings to kill the Wizard.

      My goal for this turn will be to kill the Wizard, munch on him and survive retaliation from the Knight. This is going to require 5 actions:
      1. Move
      2. Move
      3. Wraith Attack
      4. Wraith Attack
      5. Nom

      I'll abbreviate this as M-M-A-A-Nom

      My first move is obviously to get closer.


      But after my first move, from which direction should I attack?  2a or 2b?  Instinctively many players would attack from 2a.  First, there is a bias to position yourself closer to your side of the battlefield, closer to potential reinforcements, etc.  Secondly, since you are trying to avoid the Knight, without thinking about it too much, 2a sounds like a reasonable place to go since it seems "farthest" from the Knight. Here is a shot of what my Wraith would look like if I attack from 2a.


      At the end of this, I'm going to be standing with one open space between my Wraith and the Knight. The Knight has a sword and deals 300 damage per swing.  As we can see, my Wraith will have 895 health and since Wraiths have no armor, the Knight only needs 3 swings to kill me.  Now if my opponent takes a naive approach and walks straight up to me and swings, trying to kill me, the Knight will fail because of the knockback.  Since every swing will knock my Wraith back, my Wraith will survive the round.  (M-A*-M-A*-M where A* represents attacks that caused a knockback)  However, my opponent may be a bit clever and position the Knight south of my Wraith and use the wall to negate the knockback.


      As you can see from this diagram, moving into position 2a allows a clever opponent to use the wall to get the full 3 swings on my Wraith to kill it.  M-M-A-A-A

      To circumvent this, position 2b is actually the correct attack angle. If I attack from position 2b, the Knight no longer has a good angle to attack in a way that negates his own knockback.


      With my Wraith in this position, the Knight's knockback will always work against him.  If the Knight approaches from either the west or the north (or a truly silly attack from the east) then every other attack will cause a knockback, pushing my Wraith away, forcing the Knight to walk forward to close the gap before he can swing again.
      1. Move
      2. Attack (Knockback)
      3. Move
      4. Attack (Knockback)
      5. Move

      The Knight could try to attack from the south but that still doesn't give the Knight enough swings within 5 actions.  M-M-A*-M-A

      Hope this little tip helps!  See you all in game!